


Well I started off this wreath project with another idea completely. I was planning on making the Christmas candy wreath I saw over on Pinterest HERE. I tried about 7 times to make this but I was having a huge brain fart and was unable to understand how to tie on the candies so they would look full even after pushing them together. I was super frustrated and had already promised my son I would be making him a wreath for his new place.
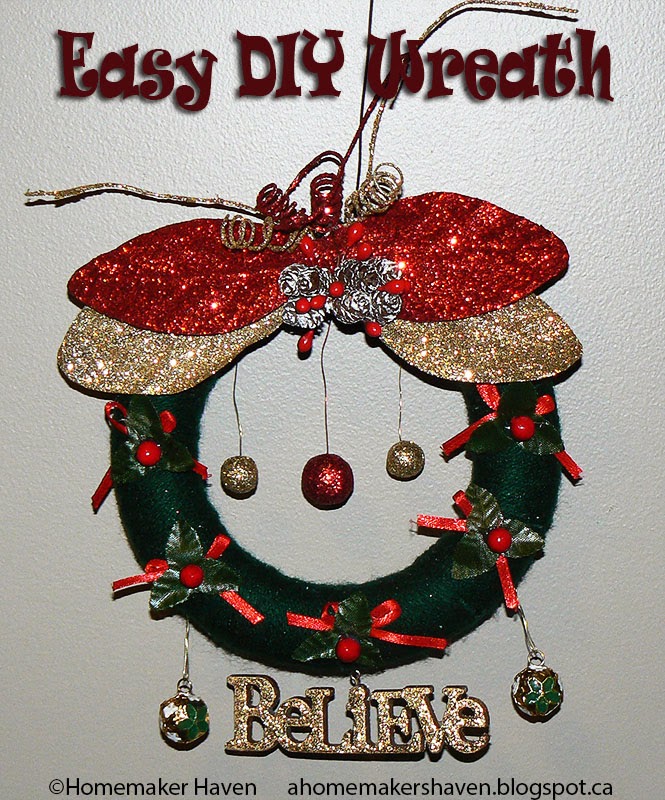
So after much deliberation I used a small Styrofoam wreath form I had and covered it with Green yarn I had laying around. To do this I would hot glue to the start of each 3 foot length of yard and place all glued start and endings on one side so the other side is neater and better to use as your 'front'. Keep doing this till the wreath form was covered. Please note that when doing this wrap around, that the inner circle is smaller so you will have to push the sections over a bit and there could be some overlapping on the inside. Try and make sure that the overlapping is not too noticeable.
Then I went to a few shops in my area to look for small decorations for the wreath. I found a bunch of supplies that were meant for larger wreathes but I cut everything so it would be better proportional. I hot glued my center leaves and decorations first as they are the focal point of the wreath. I also used some of the glittered stems from the leaves as décor for the top of the wreath. Waste not want not right? LOL
Then I gathered some of my colored craft wire and using the red wire I glued a small glittered red ball to the end and then wrapped the other end around the wreath form, so it would dangle in the middle of the wreath. I also added one gold ball with gold craft wire to either side of the red ball.
I then looked for some more greenery and found these holy pieces. They were originally part of a Christmas bell ornament that had these holly glued to the front. They were super easy to take off and if by chance the red holly berry popped off, its super easy to glue them back on.
I also found some cute small ornament balls that I attached to a 20 gauge gold wire and inserted into the foam wreath at the bottom.
The inspiration for this wreath was actually the "Believe" sentiment I found in my crafts. I painted it gold as they came in silver glitter and that would not work well with the colors I have going on. Also my son and his room-mate want mostly red and gold Christmas décor. Can you imagine 2, 22 year old's, being so specific with their decorating wishes. LOL I am getting such a kick out of how proud they are over this home and the pieces they put in it. My boy is finally growing up! Which is awesome, and a huge stress off my shoulders let me tell ya.
So I waited and waited overnight even, for the gold paint to dry but even after completing all but this step on my wreath. I finally decided to just use the gold glitter glue on the wet gold paint. I used Crafts Fine Glitter Glue and a small paintbrush to spread the glue to the edges of my word.
I am sorry that I didn't take any pictures during this craft but I didn't think it would be such a process LOL. In all honesty it went quick once I changed my plans and figured out the design.
Have you ever made a wreath? Have you blogged about it? Leave me a link in the comments below so I can go drool over your wreaths and others can get inspiration for their wreath making this year. If you haven't blogged about a wreath but have pictures, please feel free to share them with us also.
0 comments:
Post a Comment